
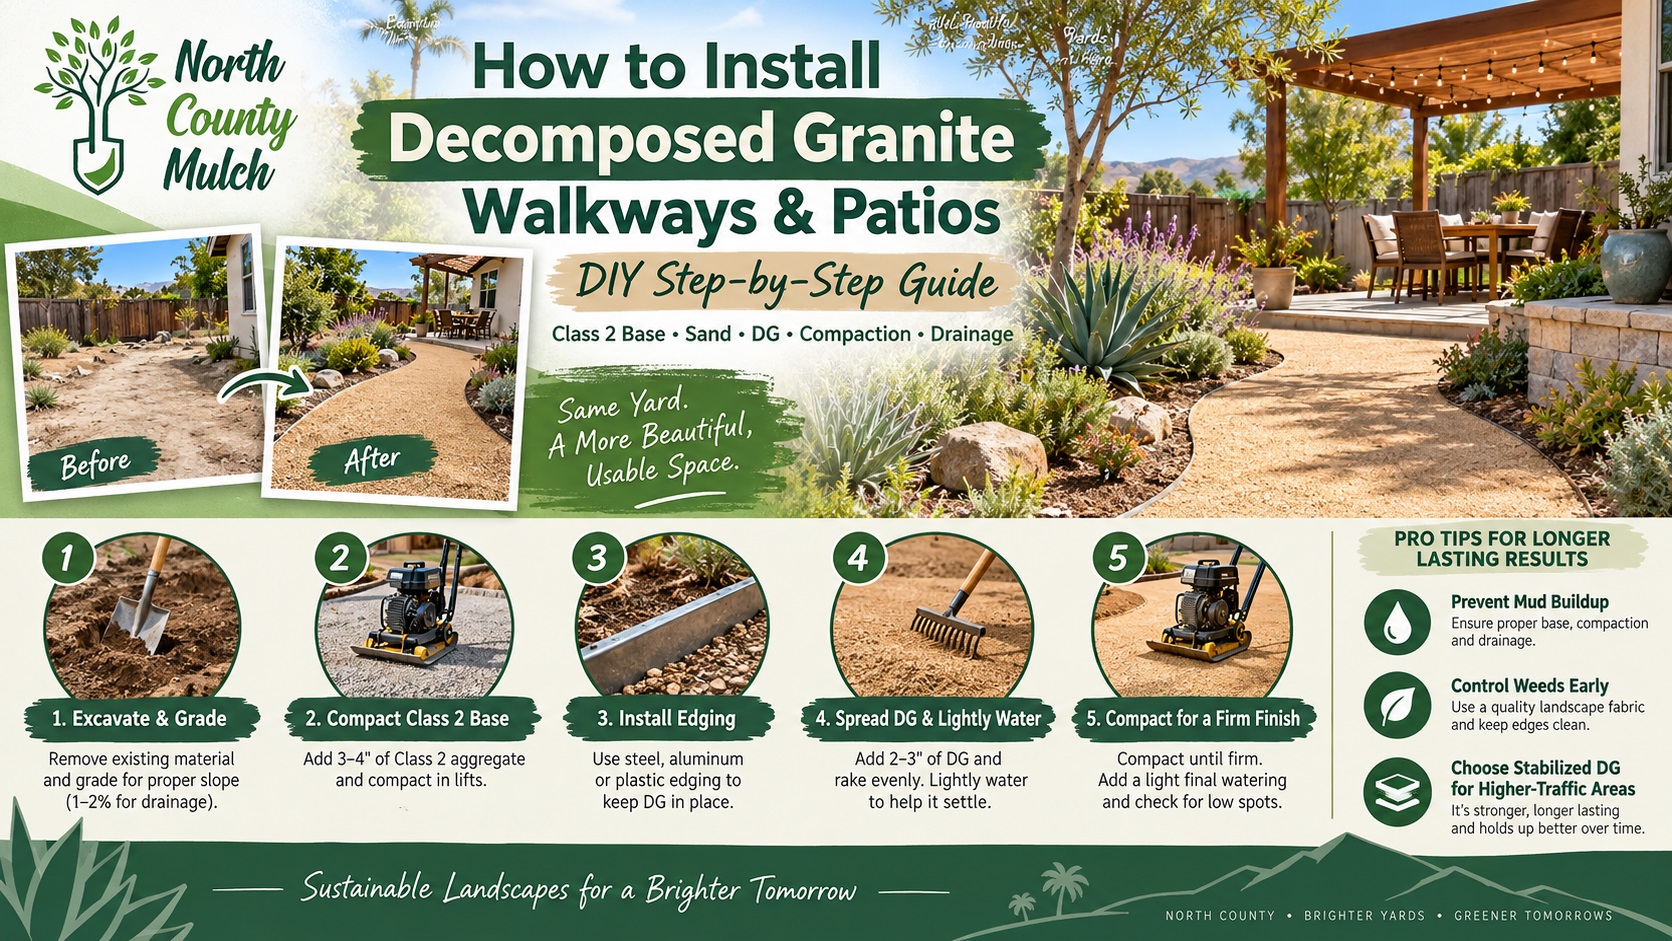
To install decomposed granite, start by excavating organic soil, establishing drainage slope, compacting the subgrade, and installing a stable aggregate base where site conditions or traffic require one. At North County Mulch, we recommend using Class 2 Base beneath higher-use DG patios and walkways where additional structural support is needed, then placing DG in manageable lifts, adding the correct amount of water, and compacting thoroughly with a plate compactor or heavy roller. Decomposed granite compacts into a smooth, natural-looking surface and works well for paths, patios, garden borders, and drought-tolerant San Diego landscapes.
Regular DG vs. Stabilized DG
Before excavation starts, decide what type of surface the project needs.
Regular Decomposed Granite
Regular DG contains small granite particles and fines that compact together naturally.
We commonly recommend it for:
- Informal garden paths
- Low-traffic walkways
- Landscape borders
- Rustic patios
- Areas where a looser natural appearance is preferred
Regular DG costs less and remains relatively easy to rake or refresh, but heavy rain, concentrated runoff, dogs, and frequent foot traffic can gradually displace material.
Stabilized Decomposed Granite
Stabilized DG combines properly graded aggregate with a binder designed to increase surface cohesion.
A stabilized surface can provide better resistance to erosion, rutting, and loose material while maintaining the appearance of natural aggregate. Manufacturer specifications for stabilized aggregate emphasize proper blending, controlled moisture, a prepared base, and thorough compaction.
For homeowners comparing stabilized DG vs regular DG, we generally favor stabilized material for higher-use patios, primary walkways, slopes, and areas where reducing loose surface material matters.
Step 1: Mark and Excavate the Area
Outline the walkway or patio with stakes, landscape paint, or a garden hose.
Remove:
- Sod
- Roots
- Organic topsoil
- Loose fill
- Existing weeds
- Soft or unstable soil
Excavation depth depends on the finished design.
For many pedestrian projects, plan enough depth for the DG surface plus any required Class 2 Base. More demanding sites may require deeper excavation.
Most importantly, account for finished elevation so DG does not end up above adjacent patios, thresholds, siding, or drainage structures.
Step 2: Establish Proper Drainage
DG should never be installed as a perfectly flat bowl.
Create a gentle grade that directs stormwater away from buildings and prevents standing water.
This matters throughout San Diego County because long dry periods can be followed by concentrated rainfall. Water repeatedly flowing across DG can create channels, wash away fines, and leave muddy low spots.
UC Cooperative Extension recommends permeable materials such as decomposed granite and gravel for landscape paths because they can allow water to remain within the landscape rather than becoming immediate surface runoff.
For additional California hardscape guidance, see the UC Cooperative Extension hardscape planning resource.
Step 3: Compact the Native Subgrade
Never spread DG over loose soil and expect surface compaction to solve the problem.
Compact the exposed native soil first.
Soft spots should be excavated and corrected before base material is installed. If the subgrade moves under foot, it can eventually create depressions in the finished DG surface.
A plate compactor works well for larger patios and walkways. A hand tamper can work in small areas and along edges.
Step 4: Add Class 2 Base Where Needed
For higher-use patios and pathways, a compacted aggregate foundation can greatly improve stability.
Class 2 Base contains crushed aggregate and fines that interlock under compaction. North County Mulch recommends installing base material with proper moisture and compacting it in manageable lifts rather than attempting to compact one thick loose layer.
Our Decomposed Granite and gravel products can be paired with the appropriate structural base depending on the project.
Compact each base lift until firm and uniform before adding more material.
Does Sand Go Under DG?
Usually, sand should not replace the structural aggregate base beneath a DG patio or walkway.
Sand has useful applications for leveling, pavers, drainage, and transitions, but a thick loose sand layer below DG can shift under traffic.
For projects involving both pavers and DG, sand may serve as the controlled bedding layer beneath the pavers while Class 2 Base provides structural support.
Step 5: Install Landscape Edging
DG performs much better when edges are restrained.
Common options include:
- Steel edging
- Aluminum edging
- Concrete curbing
- Paver borders
- Stone borders
Secure edging before spreading the final surface material.
Without containment, DG can gradually migrate into planting beds or onto adjacent pavement.
Step 6: Spread the Decomposed Granite
Place DG evenly across the prepared base.
Rather than dumping the full thickness and compacting only the top, spread it in manageable lifts.
Rake each lift to the desired contour and check grade frequently.
Keep the finished surface slightly higher before compaction because the material will settle as particles lock together.
Step 7: Water and Compact
Moisture helps fine particles settle into spaces between larger granite particles.
Apply water evenly without flooding the surface.
The goal is damp material, not mud.
Then compact using a plate compactor or heavy roller. Make several passes in different directions until the DG becomes firm and uniform.
For stabilized DG, always follow the binder manufacturer’s exact mixing, moisture, depth, and curing requirements.
Step 8: Let the Surface Set
Avoid heavy traffic immediately after installation.
Allow the surface to dry and stabilize before moving furniture, wheelbarrows, or concentrated loads across it.
Check for:
- Low spots
- Loose edges
- Standing water
- Footprints
- Surface ruts
Correcting minor problems now is easier than waiting until the next rainstorm exposes them.
Preventing Mud, Washout, and Weeds
The most common DG problems usually come from poor preparation rather than the granite itself.
Mud After Rain
Mud commonly develops when DG is too thin, poorly compacted, installed over soft soil, or placed where drainage collects.
Correct grading and a stable base are the best prevention.
Washout
Do not direct downspouts or concentrated runoff across DG.
Slopes may benefit from stabilized DG, drainage improvements, or additional erosion-control measures.
Weeds
DG can reduce weed growth, but it does not permanently eliminate weeds. Windblown seed can germinate in dust and organic debris accumulated on top.
Remove weeds early and periodically rake or clean the surface.
How Much DG Should You Order?
Use:
Square feet × depth in feet ÷ 27 = cubic yards
For a 400-square-foot patio installed at 3 inches:
400 × 0.25 ÷ 27 = 3.7 cubic yards
Add a modest allowance for compaction, grading adjustments, and jobsite loss.
Our related guide to Class 2 Base, gravel, and sand for DIY hardscapes provides more base-depth and material-calculation guidance.
Build a Better DG Patio From the Ground Up
Learning how to install decomposed granite is mostly about what happens before the final layer becomes visible.
At North County Mulch, we supply DG, Class 2 Base, sand, gravel, and other bulk landscape materials for San Diego homeowners, landscapers, and contractors.
A properly excavated, graded, compacted, and contained DG surface can create a durable natural-looking walkway or patio without the visual weight of concrete.